
Catalog & Assets
← Back to the API Reference index
Browse preset voices and visuals, and upload your own voice, portrait, face or background. Read this before you create an avatar from custom media.
Browse the Catalog
POST https://api.avatar.us.kaltura.ai/v1/catalog-item/list
{
  "filter": { "typeEqual": "Visual" },
  "pager": { "offset": 0, "limit": 100 }
}
Change typeEqual to "Voice" for voices. Each item has an itemId. Pass it to avatar creation.
Visual preset fields: itemId, attributes.visual.{name, genderPresentation, skinTone, ageGroup, hairColor, clothing, background}, imageUrl, loadingVideo. These are asset URLs for previews. They are not the rendered composite that the live video stream shows.
Voice preset fields: itemId, attributes.voice.{name, description, language}, voiceSampleUrl.
SDK: mgmt.catalog.list(ks, { type: 'Visual' }) or { type: 'Voice' }.
Upload a Custom Voice (clone)
POST https://api.avatar.us.kaltura.ai/v1/catalog-item/create (multipart/form-data)
file=@sample.mp3
attributes={"voice":{"name":"My Voice","description":"non-empty description","language":"english"}}
adminTags=custom
Returns a catalog item whose itemId is the cloned voice. Pair it with any avatar's voice.id.
Gotchas:
descriptionmust be non-empty.- Use an audio sample longer than about 6 seconds.
- Send
adminTags=custombare, not as a JSON array string.
SDK shortcut: catalog.createVoice(mp3Blob, { name, description, language?, consentRef? }, adminKs). It enforces the non-empty description client-side and tags the item adminTags:['custom'], so catalog.list filtered on that tag finds it. language is an ISO 639-1 code and defaults to 'en'.
Import a Provider Voice by id (no audio upload)
Already have a voice on ElevenLabs or Cartesia? Create the catalog Voice item directly from its provider voice id:
POST https://api.avatar.us.kaltura.ai/v1/catalog-item/createVoiceFromElevenLabs   {"voiceId":"<provider-voice-id>"}
POST https://api.avatar.us.kaltura.ai/v1/catalog-item/createVoiceFromCartesia     {"voiceId":"<provider-voice-id>"}
An unknown provider id creates nothing. The SDK throws a typed voice_not_found_elevenlabs / voice_not_found_cartesia error. SDK: mgmt.catalog.importVoiceFromElevenLabs(voiceId, ks) / importVoiceFromCartesia(voiceId, ks).
Upload a Custom Visual (portrait → animated avatar)
POST https://api.avatar.us.kaltura.ai/v1/catalog-item/create (multipart/form-data)
file=@portrait.jpg
attributes={"visual":{"name":"My Portrait","genderPresentation":"Feminine","background":"Image","skinTone":"Light","ageGroup":"YoungAdult","hairColor":"Brown"}}
adminTags=custom
Returns a catalog item whose itemId is the catalog visual. Pass it as visual.id in avatar/create (or visualId in provision). The portrait is animated live at runtime. No manual step is involved: upload, create the avatar, start a session.
How your photo renders
| Your source photo | What renders |
|---|---|
| The face fills most of the frame (a tight headshot) | The whole image shrinks. The canvas around it stays black. |
| The face is a small part of a large frame (a padded portrait) | The image fills the canvas edge to edge. No borders. |
Pad more, never less.
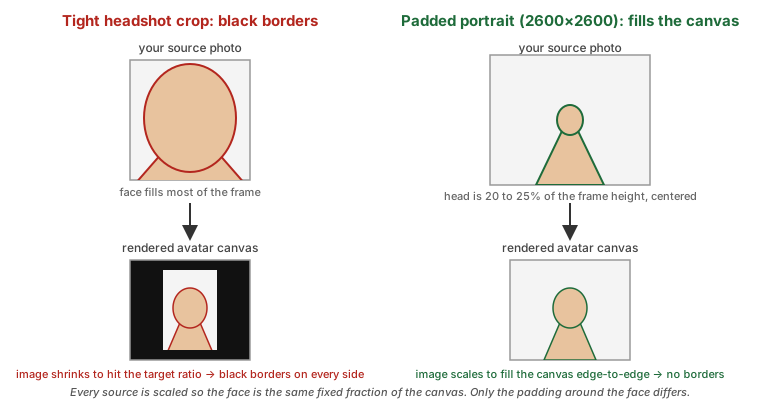
Photo specification
Prepare the source image to this spec before upload. A photo that meets it renders edge to edge.
| Property | Requirement |
|---|---|
| Canvas | Square, 2600×2600 px. Minimum 2048×2048 px. |
| Head height (chin to top of hair) | 20 to 25% of the canvas height. |
| Head position | Centered on the canvas, horizontally and vertically. Equal room on every side gives the best result. |
| Body | Shoulders and upper chest visible. Arms relaxed, not raised. |
| Background | One continuous background that reaches every edge. No borders, letterbox bars, or transparent areas. |
| Subject | One person, facing the camera, eyes open, mouth closed, even lighting. No sunglasses, hats that hide the hairline, or hands near the face. |
| File | JPEG or PNG, sRGB. |
Most photos you receive are tight portraits or phone snapshots. Do not crop them tighter. Extend them: upscale, fill the background outward, then resize to the square canvas.
Prepare a photo with an AI image model
Give an image model that supports outpainting (Gemini, GPT Image, Higgsfield, or similar) the source photo and this prompt. It performs the three steps in order: upscale, extend, resize.
Prepare this photo as an avatar source image. Keep the person's identity, face, hair,
skin tone, expression, and clothing exactly as they are. Do not restyle, beautify,
or relight the person.

1. Upscale the photo so the face stays sharp at the final size, with no visible noise
   or compression artifacts.
2. Extend the picture outward on all sides by continuing the existing background
   naturally (outpaint), until the canvas is square and the head, from chin to top of
   hair, is 20 to 25% of the canvas height. Keep the head centered on the canvas,
   horizontally and vertically, with the shoulders and upper chest visible below it.
   The background must reach every edge: no borders, frames, bars, or transparent areas.
3. Output one 2600×2600 px JPEG or PNG.
If the photo already has a flat, single-color background, pad it with that color instead of an AI model. Measure the head height h in pixels, then pad to a square of about 4.5×h and resize:
side=$((h * 9 / 2))
magick portrait.jpg -gravity center -background '#f2f2f2' -extent "${side}x${side}" -resize 2600x2600 avatar-source.jpg
Before upload, check the result against the spec table: square canvas, head height in range, head centered, background touching every edge, and the person unchanged next to the original.
The API accepts any subset of the attribute fields, including none. Video-clip ingest is not available through this API.
SDK shortcut: catalog.createVisual(imageBlob, { name, genderPresentation, background, skinTone, ageGroup, hairColor }, adminKs) requires name and genderPresentation client-side (bad_request before any network call if either is missing) and defaults the rest to a consistent baseline look. Returns the server response as is: { itemId, loadingVideo }.
Upload a custom Face or Background (compose-a-visual path)
createVisual above uploads a photo directly as a ready-to-use Visual. catalog-item/create also accepts an explicit Face/Background type, producing the two composable HALVES that the avatar/create face/background fields expect instead. This uses the same multipart shape and attribute fields as a Visual upload, just with type set.
Watch for this name collision: the attributes.visual.background field below is a photo ATTRIBUTE string (e.g. "Image") describing the upload's own backdrop. It's unrelated to avatar/create's own background field, the {type:'color'|'visual', value} composition selector used a few steps later.
file=@face-portrait.jpg
attributes={"visual":{"name":"Support rep","genderPresentation":"Feminine","background":"Image","skinTone":"Light","ageGroup":"YoungAdult","hairColor":"Brown"}}
type=Face
adminTags=custom
Send type=Background for a backdrop image instead.
SDK shortcut: catalog.createFace(imageBlob, attrs, adminKs) / catalog.createBackground(imageBlob, attrs, adminKs). Same attrs shape as createVisual. Composing the two halves into an avatar: Agent Components · Create an Avatar and an Agent § Compose from a custom Face and Background.
End-to-end: custom portrait avatar, server to browser
Each step lives on its own page. Follow them in order:
- Upload the portrait: § Upload a Custom Visual, above. Returns
itemId. - Create the avatar with
visual: { id: itemId }, then the agent: Agent Components · Create an Avatar and an Agent. - Resolve the widget id and initialize the browser runtime: Widget & Runtime Init.
- Start the conversation from the browser with a silent opening and
kickoff: Start the Conversation.